해당 코드는 Github 에서 확인할 수 있으며 Spring Config Server 정리 글과 이어지는 글입니다.
Spring Config Server 정리 를 통해서 Config Server에 대해서 알아봤습니다. 이번 포스팅에서는 Config Client를 알아보겠습니다.
각 서비스 애플리케이션은 해당 애플리케이션이 구동시 Config Server에 자신의 Config의 설정 파일을 읽어 오며, 애플리케이션이 구동 중에도 Config 설정을 변경해도 애플리케이션 재시작 없이 해당 변경 내용을 반영할 수 있습니다.
Config Client 구성 1 2 3 4 dependencies { implementation("org.springframework.cloud:spring-cloud-starter-config" ) implementation("org.springframework.cloud:spring-cloud-starter-bus-kafka" ) }
config: Config Client 의존성
bus-kafka: Cloud Bus를 이용해서 변경사항을 모든 인스턴스에게 전달하는 경우 사용
1 2 3 4 5 6 7 8 9 10 11 12 13 14 15 16 17 18 19 20 21 22 23 server: port: 8181 spring: application: name: order-service kafka: bootstrap-servers: localhost:29092 config: import: "optional:configserver:http://localhost:8888" management: endpoints: web: exposure: include: - "*" endpoint: refresh: enabled: true
(1): 애플리케이션 이름을 지정 spring.application.name 값을 기준으로 Config Repositroy 저장소에 있는 Config 파일을 인식해서 가져오기 때문에 반드시 두 값을 일치 시켜야 합니다.
spring.application.name=order-service의 경우 order-service-{evn}.yml을 Config 파일로 인식함
(2): 변경사항을 전파하는 카프카 주소 작성
(3): Config Server 주소 작성, optional:configserver:{address}으로 작성
(4): actuator의 속성을 *으로 전체 공개, 실제 운영 애플리케이션에서는 필요한 부분만 공개해야 합니다.
1 2 3 4 5 6 7 8 9 10 11 12 message: profile: "default" server-name: "Config Server" message: profile: "sandbox" message: profile: "production"
Config Server 저장소 Gtihub Repository에는 위와 같은 yml이 구성되어 있습니다.
애플리케이션 구동 spring.application.name=order-service, profile=local 설정인 애플리케이션 구동했을 때는의 경우로 설명드리겠습니다. 애플리케이션이 구동할 때 Config Server에게 자신의 Config 설정을 가져옵니다. 위 이미지에서는 1, 2번 항목에 해당합니다. 자세히 코드 레벨로 살펴보겠습니다.
서버가 구동하면 /{name}/{profiles:.*[^-].*} API를 호출합니다. 해당 API 코드는 아래와 같습니다.
1 2 3 4 5 # EnvironmentController.class @RequestMapping(path = "/{name}/{profiles:.*[^-].*}", produces = EnvironmentMediaType.V2_JSON) public Environment defaultLabelIncludeOrigin (@PathVariable String name, @PathVariable String profiles) { return getEnvironment(name, profiles, null , true ); }
spring.application.name=order-service, profile=local 설정을 기반으로 Config Server의 API를 호출하여 자신의 애플리케이션을 가져옵니다.
Order Application 설정 확인 1 2 3 4 5 6 7 8 9 10 @RestController @RequestMapping("/orders" ) class OrderApi ( @Value("\${message.profile}" ) val profile: String ) { @GetMapping("/profile" ) fun getRepoProfile () return profile } }
message.profile 설정 확인을 하기 위해서 간단한 API를 만들어 보고 테스트를 진행해 보겠습니다.
1 2 3 4 5 6 7 8 9 10 11 12 13 GET http://localhost:8181/orders/profile HTTP/1.1 200 Content-Type: application/json Content-Length: 5 Date: Sun, 01 Aug 2021 13:15:56 GMT Keep-Alive: timeout=60 Connection: keep-alive local Response code: 200; Time: 198ms; Content length: 5 bytes
Config 서버를 통해서 가져온 값이 정상적으로 order application에 가져온 것을 확인할 수 있습니다.
Config Server를 통해해서 가져온 Confg 값을 다시 살펴보겠습니다. message.profile=local은 정상적으로 가져온 것을 확인할 수 있으며, local 프로필에는 message.server-name값이 없기 때문에 해당 값은 default config인 order-service.yml값의 message.server-name=Config Server의 설정값을 사용합니다. 즉 default 값도 확인해야 하기 때문에 profile, default profile을 조회합니다.
재시작 없이 Config 변경 Config Server의 가장 큰 장점 중 하나는 서버가 재시작 없이 Config 설정 파일을 바꿀 수 있다는 점입니다. 해당 기능에 대해서 살펴보겠습니다.
actuator 설정을 통해서 공개된 refresh API를 통해서 애플리케이션 구동 중에 Config 설정을 변경할 수 있습니다.
1 2 3 4 5 6 7 8 9 10 11 12 13 14 15 16 17 18 19 20 21 22 23 24 25 26 27 28 29 30 31 32 33 34 35 GET http://192.168.0.5:8585/actuator HTTP/1.1 200 Content-Type: application/vnd.spring-boot.actuator.v3+json Content-Length: 435 Date: Sat, 07 Aug 2021 00:53:20 GMT Keep-Alive: timeout=60 Connection: keep-alive { "_links": { "self": { "href": "http://192.168.0.5:8585/actuator", "templated": false }, "info": { "href": "http://192.168.0.5:8585/actuator/info", "templated": false }, "refresh": { "href": "http://192.168.0.5:8585/actuator/refresh", "templated": false }, "busrefresh-destinations": { "href": "http://192.168.0.5:8585/actuator/busrefresh/{*destinations}", "templated": true }, "busrefresh": { "href": "http://192.168.0.5:8585/actuator/busrefresh", "templated": false } } } Response code: 200; Time: 78ms; Content length: 435 bytes
GET https://localhost:8585/actuator refresh, busrefresh API가 공개되어 있는 것을 확인할 수 있습니다. refresh 부터 설명드리겠습니다.
1 2 3 4 5 6 7 8 9 10 11 @RestController @RequestMapping("/orders" ) @RefreshScope class OrderApi ( @Value("\${message.profile}" ) val profile: String ) { @GetMapping("/profile" ) fun getRepoProfile () return profile } }
1 2 3 message: profile: "new local"
(1) @RefreshScope 어노테이션을 추가를 합니다.
(2) Config Repositroy에 있는 Config 설정을 위처럼 변경해서 Push 합니다.
(3) POST /actuator/refresh API를 호출하여 변경 내용을 반영합니다.
(4) GET /orders/profile을 호출하여 변경 내용은 확인합니다.
1 2 3 4 5 6 7 8 9 10 11 12 13 14 15 POST http://localhost:8585/actuator/refresh HTTP/1.1 200 Content-Type: application/vnd.spring-boot.actuator.v3+json Content-Length: 43 Date: Sun, 01 Aug 2021 14:22:38 GMT Keep-Alive: timeout=60 Connection: keep-alive [ "config.client.version", "message.profile" ] Response code: 200; Time: 6374ms; Content length: 43 bytes
POST /actuator/refresh API를 호출하면 변경한 propertie의 key 값을 확인할 수 있습니다.
1 2 3 4 5 6 7 8 9 10 11 12 GET http://localhost:8181/orders/profile HTTP/1.1 200 Content-Type: application/json Content-Length: 10 Date: Sun, 01 Aug 2021 14:22:57 GMT Keep-Alive: timeout=60111 Connection: keep-alivew new local Response code: 200; Time: 186ms; Content length: 10 bytes
GET /orders/profile을 호출하면 위에서 변경한 내용을 확인할 수 있습니다. 서버가 구동 중이라도 Config Server를 이용해서 설정 파일을 동적으로 변경할 수 있습니다.
동일한 설정이 로컬 환경에도 있는 경우에는? 1 2 3 4 5 6 7 8 9 10 message: profile: "new local2" message: profile: "new local local"
로컬 프로퍼티와, Config 프로퍼티가 중복될 경우 어느 것을 우선되는지 확인해 보겠습니다.
1 2 3 4 5 6 7 8 9 10 11 12 GET http://192.168.0.5:8585/orders/profile HTTP/1.1 200 Content-Type: text/plain;charset=UTF-8 Content-Length: 10 Date: Sat, 07 Aug 2021 01:04:59 GMT Keep-Alive: timeout=60 Connection: keep-alive new local2 Response code: 200; Time: 45ms; Content length: 10 bytes
GET http://192.168.0.5:8585/orders/profile을 호출해보면 본인 설정보다 Config Server 설정이 우선되는 것을 확인할 수 있습니다. 해당 설정을 로컬에도 가지고 있는 경우에는 이 점을 유의해야 합니다.
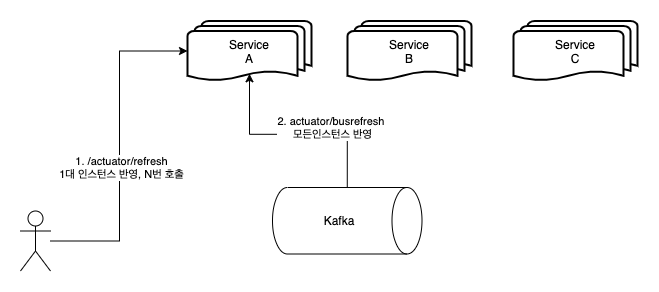
서버가 여러대의 경우 Cloud Bus
일반적으로 서비스 인스턴스들은 2대 이상으로 구성하게 됩니다. 그러기 때문에 /actuator/refresh 호출을 인스턴스 수에 따라서 N 번 해야 하며, 컨테이너 환경에서는 해당 작업은 더 복잡합니다. 이러한 문제는 Spring Cloud Bus 를 이용해서 Kafka으로 브로드캐스팅 방식으로 변경사항을 모든 인스턴스에게 전달하는 방식으로 해결할 수 있습니다.
메시지 플랫폼으로는 spring-cloud-starter-bus-amqp, spring-cloud-starter-bus-kafka을 선택할 수 있습니다. bus-amqp는 Rabbit MQ를 사용하고, kafka는 Kafka를 사용합니다. 본 예제는 Kafka를 기준으로 설명드리겠습니다.
Kafka Docker 1 2 3 4 5 6 7 8 9 10 11 12 13 14 15 16 17 18 19 20 21 22 23 24 version: '3' services: zookeeper: image: confluentinc/cp-zookeeper:latest environment: ZOOKEEPER_CLIENT_PORT: 2181 ZOOKEEPER_TICK_TIME: 2000 ports: - 22181 :2181 kafka: image: confluentinc/cp-kafka:latest depends_on: - zookeeper ports: - 29092 :29092 environment: KAFKA_BROKER_ID: 1 KAFKA_ZOOKEEPER_CONNECT: zookeeper:2181 KAFKA_ADVERTISED_LISTENERS: PLAINTEXT://kafka:9092,PLAINTEXT_HOST://localhost:29092 KAFKA_LISTENER_SECURITY_PROTOCOL_MAP: PLAINTEXT:PLAINTEXT,PLAINTEXT_HOST:PLAINTEXT KAFKA_INTER_BROKER_LISTENER_NAME: PLAINTEXT KAFKA_OFFSETS_TOPIC_REPLICATION_FACTOR: 1
위 처럼 카프카 도커를 구성해서 도커를 구동시킵니다.
카프카 이벤트로 변경사항 전파 1 2 3 4 5 6 7 8 9 10 11 12 13 14 spring: application: name: order-service kafka: bootstrap-servers: localhost:29092 management: endpoints: web: exposure: include: - "refresh" - "bus-refresh"
위에서 구성한 카프카 설정, actuator으로 bus-refresh을 노출시키는 설정을 완료합니다. 해당 설정을 완료했다면 인스턴스를 2대를 각각 다른 포트로 애플리케이션을 구동시킵니다.
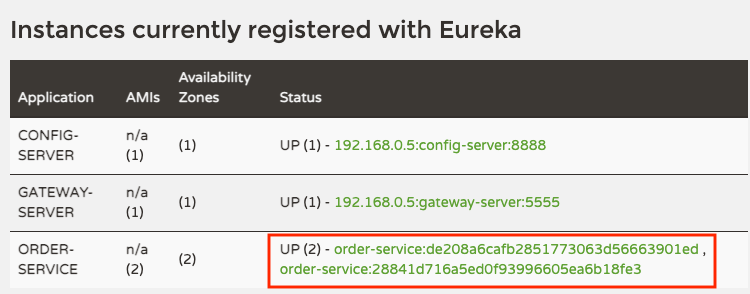
포스팅에서는 Eureka를 통해서 order-service를 랜덤 포트를 이용해서 2대를 구성했습니다. 포트가 각기 다르게 profile local으로 띄우기만 하면 되니 굳이 유레카에 해당 서버를 등록시킬 필요는 없습니다. 인스턴스가 2개를 띄웠다는 부분을 표시하기 위해서 이미지를 첨부했습니다.
각각 서버에서 /orders/profile을 호출해서 message.profile를 확인해보겠습니다.
1 2 3 4 5 6 7 8 9 10 11 12 13 14 15 16 17 18 19 20 21 22 23 24 25 26 27 GET http://192.168.0.5:58704/orders/profile HTTP/1.1 200 Content-Type: text/plain;charset=UTF-8 Content-Length: 10 Date: Sat, 07 Aug 2021 04:36:43 GMT Keep-Alive: timeout=60 Connection: keep-alive new local2 Response code: 200; Time: 59ms; Content length: 10 bytes GET http://192.168.0.5:59013/orders/profile HTTP/1.1 200 Content-Type: text/plain;charset=UTF-8 Content-Length: 10 Date: Sat, 07 Aug 2021 04:36:30 GMT Keep-Alive: timeout=60 Connection: keep-alive new local2 Response code: 200; Time: 56ms; Content length: 10 bytes
로컬 프로퍼티를 정상적으로 인식하는 것을 확인할 수 있습니다. 그렇다면 Config Server의 프로퍼티를 message.profile="local"으로 Push 한 이후 포트 59013 서버 1대에 /actuator/busrefresh를 호출하겠습니다.
1 2 3 4 5 6 7 8 9 10 11 POST http://192.168.0.5:59013/actuator/busrefresh HTTP/1.1 204 Date: Sat, 07 Aug 2021 04:42:33 GMT Keep-Alive: timeout=60 Connection: keep-alive <Response body is empty> Response code: 204; Time: 6842ms; Content length: 0 bytes
정상적으로 호출이 완료되었으면 59013, 58704 서버를 모두 확인해보겠습니다.
1 2 3 4 5 6 7 8 9 10 11 12 13 14 15 16 17 18 19 20 21 22 23 24 25 26 GET http://192.168.0.5:58704/orders/profile HTTP/1.1 200 Content-Type: text/plain;charset=UTF-8 Content-Length: 5 Date: Sat, 07 Aug 2021 04:42:47 GMT Keep-Alive: timeout=60 Connection: keep-alive local Response code: 200; Time: 47ms; Content length: 5 bytes GET http://192.168.0.5:59013/orders/profile HTTP/1.1 200 Content-Type: text/plain;charset=UTF-8 Content-Length: 5 Date: Sat, 07 Aug 2021 04:43:05 GMT Keep-Alive: timeout=60 Connection: keep-alive local Response code: 200; Time: 151ms; Content length: 5 bytes
59013 서버에 이벤트를 반영했지만 58704 서버에도 해당 내용이 전파된 것을 확인할 수 있습니다.
이벤트 확인
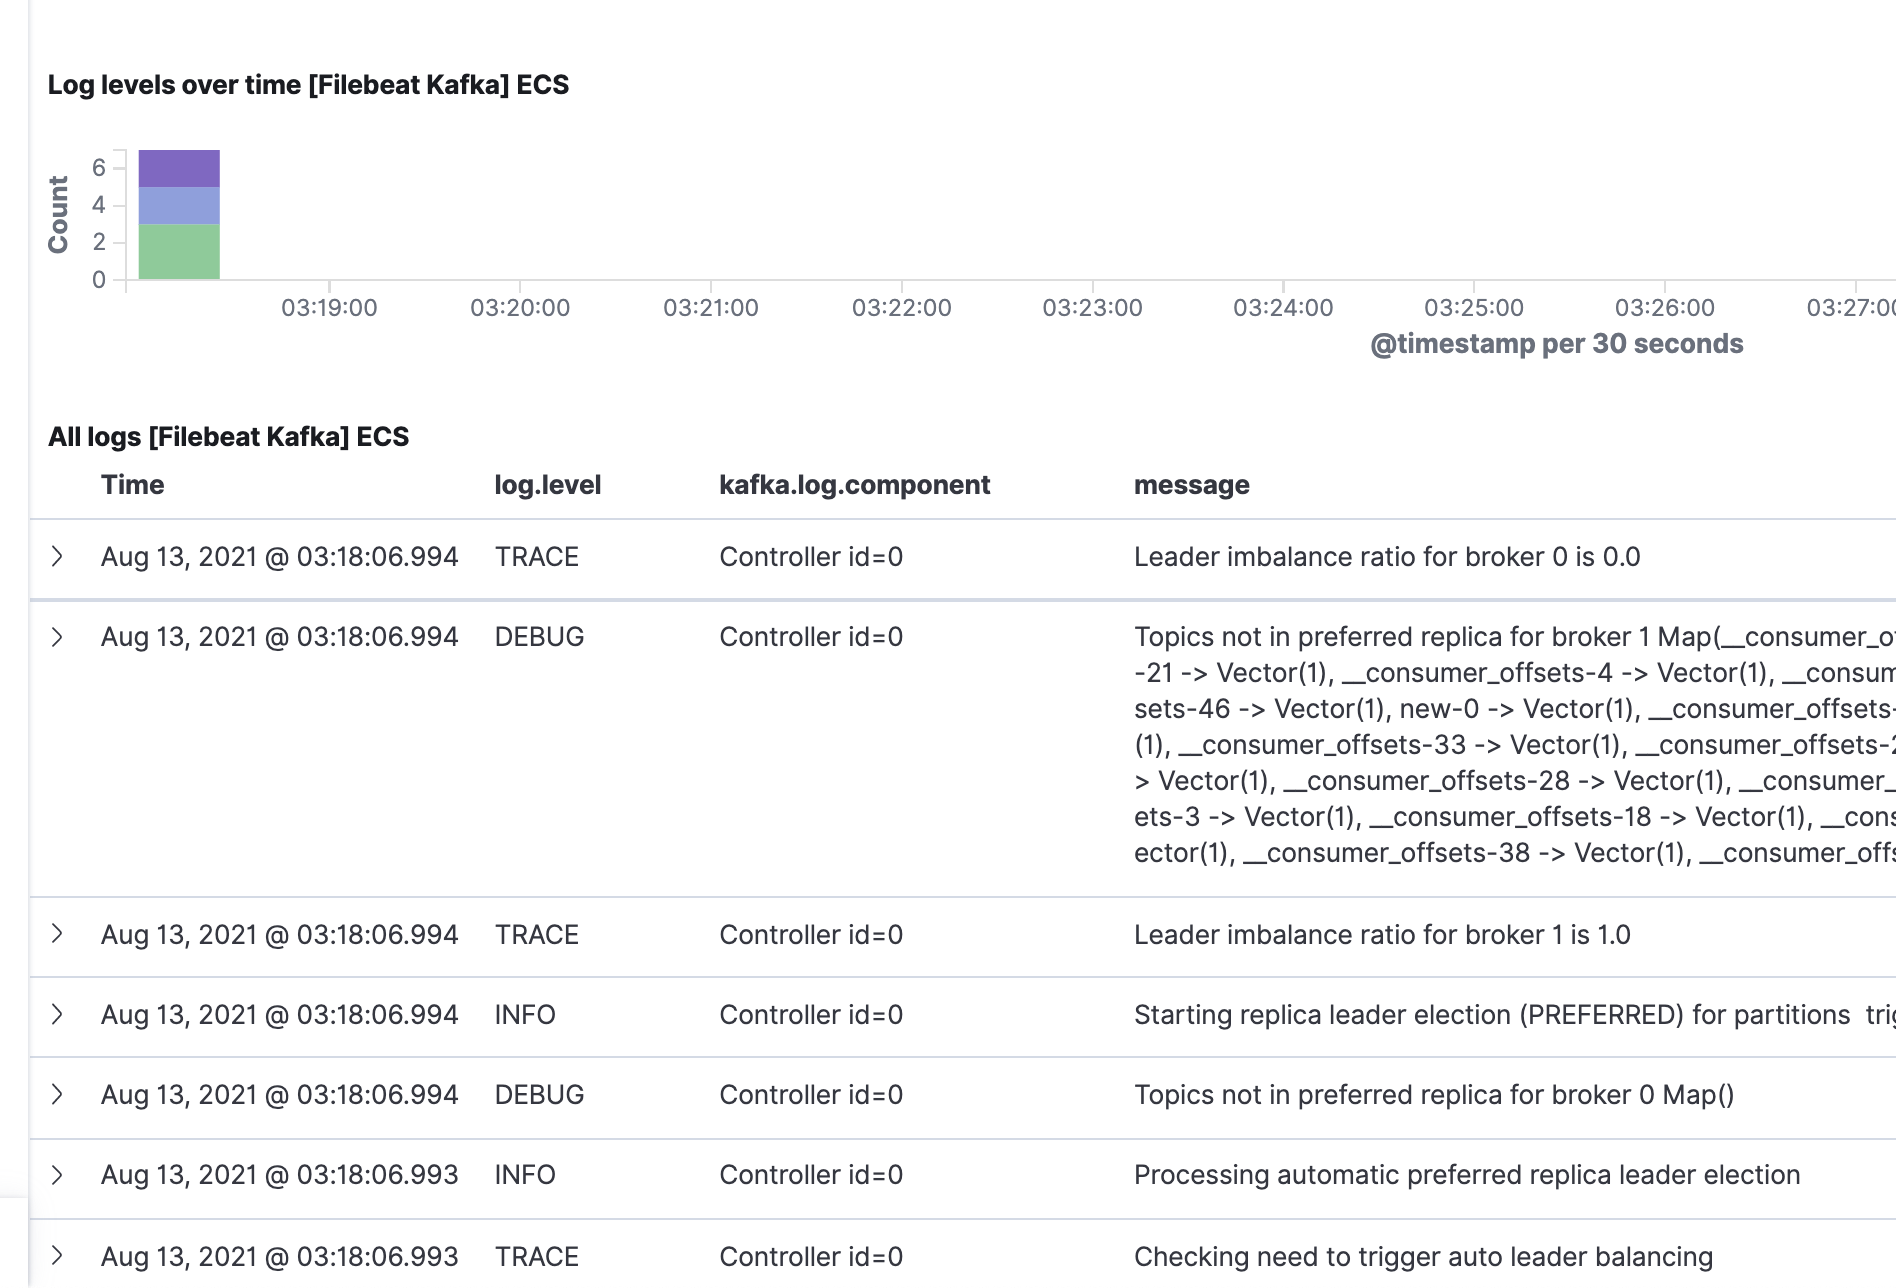
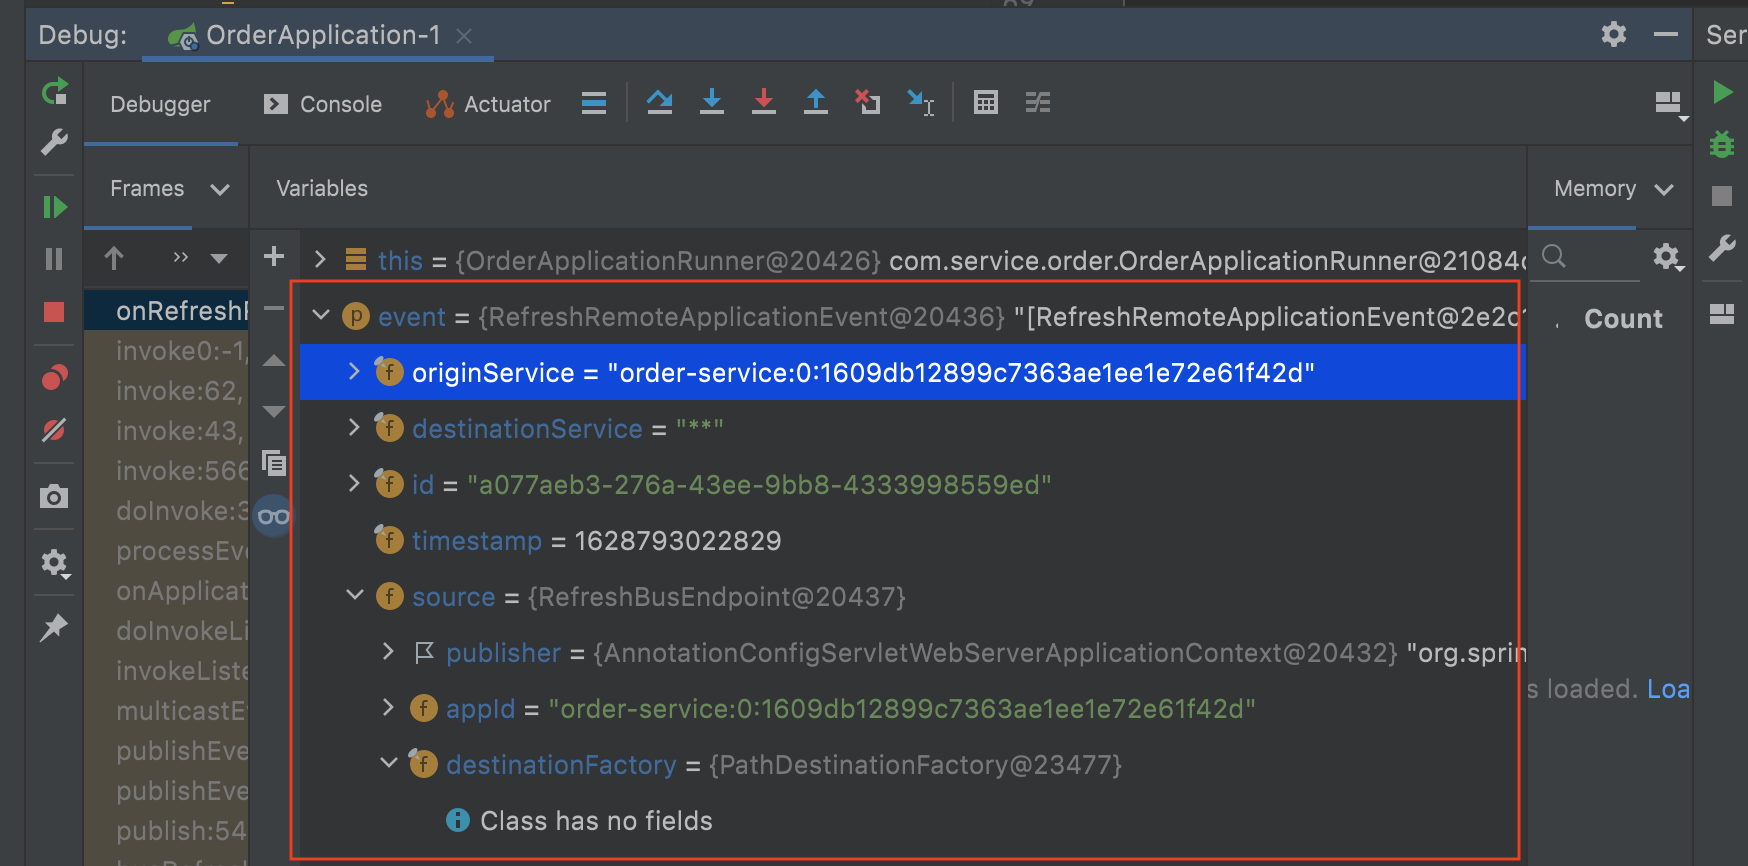
카프카 로그를 보면 정상적으로 이벤트가 발행된 부분을 확인할 수 있으며, 위에서 지정한 토픽 이름인 ${spring.application.name}config-bus-refesh-event을 확인할 수 있습니다. 만약 코드 레벨에서 Config 변경 이벤트 구독 받아 후속 작업을 하고 싶은 경우에는 @EventListener으로 RefreshRemoteApplicationEvent 이벤트를 구독 받아 처리할 수 있습니다.
1
2
3
4
5
6
7
8
9
@EventListener fun onRefreshRemoteEvent (event: RefreshRemoteApplicationEvent ) log.info("Event...." ) log.info(event.id) log.info(event.source.toString()) log.info(event.originService) log.info(event.destinationService) log.info("Event...." ) }
디버깅 모드로 실제 값들을 확인할 수 있습니다.