해당 코드는 Github에서 확인할 수 있습니다.
데이터베이스 스키마 구성하기
가장 먼저 데이터베이스를 생성해야합니다.
1
| mysql> create database oauth2;
|
1
2
3
4
5
6
7
8
9
10
11
12
13
14
15
16
17
| spring:
profiles: init
jpa:
database: mysql
properties.hibernate.dialect: org.hibernate.dialect.MySQL5InnoDBDialect
hibernate:
ddl-auto: create
show-sql: true
properties:
hibernate.format_sql: true
datasource:
url: jdbc:mysql://localhost:3306/oauth2?useSSL=false&serverTimezone=UTC
username: <your-usesrname>
password: <your-password>
driver-class-name: com.mysql.cj.jdbc.Driver
initialization-mode: always
platform: oauth2
|
데이터 베이스 구성을 위한 profile을 구성합니다. 해당 profile은 OAuth2에 대한 스키마 생성 및 더미데이터를 insert 해줍니다.
datasource.platform 속성 값에 oauth2가 입력되어 있습니다. 간단하게 설명드리면 resources에 위치한 ${platform}.sql을 실행시킵니다.
프로젝트에 resources 디렉토리에는 schema-oauth2.sql, data-oauth2.sql가 존재하고 각각은 테이블 스미카, oauth_client_details 더미데이터 insert 입니다. 세부적인 sql 파일을 직접 확인하는것을 권장드립니다.
프로젝트의 profile은 init으로 구동시에 schema-oauth2.sql , data-oauth2.sql가 실행됩니다. 프로젝트 실행시에 딱 한번만 init으로 진행하시고 이후 부터는 local로 진행하시면 됩니다.
oauth_client_details table
1
2
3
4
5
6
7
8
9
10
11
12
13
14
15
16
17
18
19
20
21
22
23
24
25
26
27
| INSERT INTO `oauth_client_details`(
`client_id`,
`resource_ids`,
`client_secret`,
`scope`,
`authorized_grant_types`,
`web_server_redirect_uri`,
`authorities`,
`access_token_validity`,
`refresh_token_validity`,
`additional_information`,
`autoapprove`
)
VALUES(
'client',
null,
'{bcrypt}$2a$10$iP9ejueOGXO29.Yio7rqeuW9.yOC4YaV8fJp3eIWbP45eZSHFEwMG',
'read_profile,read_posts',
'authorization_code,implicit,password,client_credentials,refresh_token',
'http://localhost:9000/callback',
null,
3000,
6000,
null ,
'false'
);
|
- client_id : 클라이언트를 구분하는 ID
- client_secret : 클라이언트의 비밀번호로 OAuth2 서버에 요청할때 인증을 하기위한 용도로 사용한다.
- authorized_grant_types: OAuth2 승인 방식의 종류
..., ... 이런 형식으로,를 이용해서 구분한다.
- access_token_validity : Access Token의 유효시간
- refresh_token_validity : Refresh Token의 유효 시간
- scope: 클라이언트로 발급된 Access Token의 Scope, 리소스에 접근 가능한 권한 구분은
, 으로한다
- autoapprove: 권한코드 방식 같은 형태로 Access Token을 발급받을 때에는 사용자에게 scope 범위를 허가받는 화면이 나옵니다. 이 화면 자체가 나오지 않게 설정하는 값입니다. true하면 아래 화면이 나오지 않습니다.
프로젝트 구동
1
2
3
| spring:
profiles:
active: init
|
프로젝트를 실행할때 application.yml 최상단에 있는 active를 local로 변경합니다. 스키마, 더미데이터 입력이 목적이기 때문에 프로젝트 최초 1회 구동시 init으로 진행하시고 이후는 local로 진행하면됩니다.
OAuth2 테이블

프로젝트를 구동하면 테이블 생성 및 더미데이터를 확인 할 수 있습니다.
Code
이전에 코드에 몇가지 빈들을 등록하게 되면 간단하게 RDBMS에 토큰 정보를 저장할 수 있습니다.
1
2
3
4
5
6
7
8
9
10
11
12
13
14
15
16
17
18
19
20
21
22
23
24
25
26
27
28
29
30
31
32
33
34
35
36
37
38
39
40
41
42
43
44
45
46
47
48
49
50
| @Configuration
@EnableAuthorizationServer
@AllArgsConstructor
public class AuthorizationServerConfig extends AuthorizationServerConfigurerAdapter {
private final DataSource dataSource;
@Override
public void configure(ClientDetailsServiceConfigurer clients) throws Exception {
clients
.jdbc(dataSource)
;
}
@Override
public void configure(AuthorizationServerEndpointsConfigurer endpoints) {
endpoints
.approvalStore(approvalStore())
.tokenStore(tokenStore())
.authenticationManager(authenticationManager)
;
}
@Bean
public TokenStore tokenStore() {
return new JdbcTokenStore(dataSource);
}
@Bean
public ApprovalStore approvalStore() {
return new JdbcApprovalStore(dataSource);
}
@Bean
public PasswordEncoder passwordEncoder() {
return new BCryptPasswordEncoder();
}
}
|
- (1) 토큰에 대한 영속화를 진행하기 위해서
Datasoruce 의존성을 주입받습니다.
- (2) 주입 받은
Datasoruce 의존성을 기반으로 JdbcTokenStore을 생성합니다.
- (3) 2번과 마찬가지로
Datasoruce을 주입시켜 JdbcApprovalStore을 생성합니다.
- (4) 2,3 번에서 생성한 객체을
AuthorizationServerEndpointsConfigurer 객체에 넣어줍니다.
- (5) clinet
inMemory() 방식에서 jdbc() 방식으로 변경합니다. 의존성은 dataSource 주입해줍니다.
TokenStore 인터페이스는 Access Token, Refresh Token과 관련된 인증 데이터를 저장, 검색, 제거, 읽기에 대한 정의입니다.
ApprovalStore 인터페이스는 리소스의 소유자의 승인을 추가, 검색, 취소 하기위한 메서드들이 정의되있습니다.
이렇듯 스프링에서는 인터페이스를 제공함으로써 확장포인트를 열어두어 확장에는 열려있는 모듈을 지향하고 있습니다.
대표적으로 Resource Owner Password Credentials Grant, Authorization Code Grant Type 인증을 살펴보겠습니다.
Resource Owner Password Credentials Grant
요청
1
2
3
4
5
| curl -X POST \
http://localhost:8080/oauth/token \
-H 'Authorization: Basic Y2xpZW50OnBhc3N3b3Jk' \
-H 'Content-Type: application/x-www-form-urlencoded' \
-d 'username=user&password=pass&grant_type=password&scope=read_profile'
|
응답
1
2
3
4
5
6
7
| {
"access_token": "a7cce128-bd4a-4986-a56b-de75f5246364",
"token_type": "bearer",
"refresh_token": "a7c43419-4875-47f5-9d79-829301ed0030",
"expires_in": 871,
"scope": "read_profile"
}
|
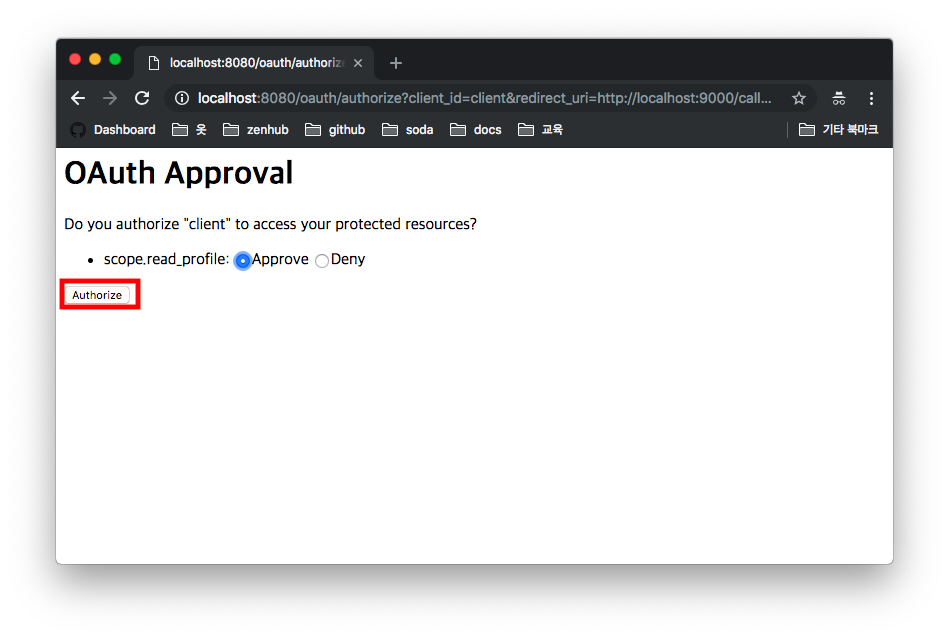
Authorization Code Grant Type
요청
http://localhost:8080/oauth/authorize?client_id=client&redirect_uri=http://localhost:9000/callback&response_type=code&scope=read_profile 해당 페이지로 이동

로그인 정보를 입력합니다.
1
2
| username: user
password: pass
|


권한 승인이 완료하면 권한 코드가 전송됩니다. Authorization Code Grant Type 방식 에서 말한 권한 부여 코드를 응답받은 것입니다.
넘겨받은 승인 코드로 Authorization Code Grant 인증을 진행합니다.
1
2
3
4
5
| curl -X POST \
http://localhost:8080/oauth/token \
-H 'Authorization: Basic Y2xpZW50OnBhc3N3b3Jk' \
-H 'Content-Type: application/x-www-form-urlencoded' \
-d 'code=rNHo29&grant_type=authorization_code&redirect_uri=http%3A%2F%2Flocalhost%3A9000%2Fcallback&scope=read_profile'
|
만약 IntelliJ를 사용하신다면 api.http를 이용해서 더 쉽게 호출 해볼 수 있습니다.

응답
1
2
3
4
5
6
7
| {
"access_token": "883c329b-8f05-457c-907c-ce8637a7aa80",
"token_type": "bearer",
"refresh_token": "a7c43419-4875-47f5-9d79-829301ed0030",
"expires_in": 2942,
"scope": "read_profile"
}
|
입력된 데이터


위에서 발급 받은 Access Token, Refresh Token을 확인 할 수 있습니다.
참고